How to Re-Tile a Kitchen?
Re-tiling a kitchen can completely transform the look and feel of the space, making it more modern, stylish, and functional. Whether you’re tackling a backsplash, countertop, or floor, learning how to re-tile a kitchen is a valuable skill that can save you money and give you the satisfaction of completing a DIY project.
In this guide, we’ll walk you through the entire process, from removing old tiles to installing new ones, ensuring a professional finish that will last for years.
Why Re-Tile Your Kitchen?
Before diving into the steps of how to re-tile a kitchen, it’s important to understand the benefits of undertaking this project.
Update the Aesthetic
- Modernize Your Space: Re-tiling allows you to update your kitchen’s look, whether you’re going for a sleek, modern design or a cozy, rustic feel. New tiles can breathe life into an outdated kitchen.
- Increase Home Value: A well-done re-tiling job can increase the value of your home. Potential buyers are often attracted to kitchens with new, stylish tiles.
Improve Functionality
- Easier Maintenance: New tiles, especially those designed for high-traffic areas, can make your kitchen easier to clean and maintain. Choosing tiles that are resistant to stains, moisture, and wear can simplify your kitchen upkeep.
- Fix Issues: Re-tiling gives you the opportunity to address any underlying issues, such as cracked or loose tiles, damaged grout, or water damage.
Materials and Tools Needed to Re-Tile a Kitchen
To successfully re-tile your kitchen, you’ll need to gather the following materials and tools:
Materials
- Tiles: Choose the type and style of tiles that best suit your kitchen’s design. Options include ceramic, porcelain, glass, and natural stone tiles.
- Tile Adhesive: A high-quality tile adhesive or thin-set mortar is essential for securing the tiles to the surface.
- Grout: Select grout in a color that complements your tiles. Grout is used to fill the spaces between tiles and provide a finished look.
- Tile Spacers: These small plastic pieces ensure even spacing between tiles during installation.
- Tile Sealer: If using natural stone tiles or unglazed tiles, a sealer will help protect the tiles from stains and moisture.
Tools
- Tape Measure: For measuring the area to be tiled and cutting tiles to the correct size.
- Tile Cutter or Wet Saw: A tile cutter or wet saw is used to cut tiles to fit around edges, outlets, and other obstacles.
- Trowel: A notched trowel is used to spread the tile adhesive evenly across the surface.
- Rubber Grout Float: This tool is used to apply grout between the tiles.
- Level: A level ensures that your tiles are installed straight and even.
- Sponge and Bucket: For cleaning excess grout and adhesive from the tiles.
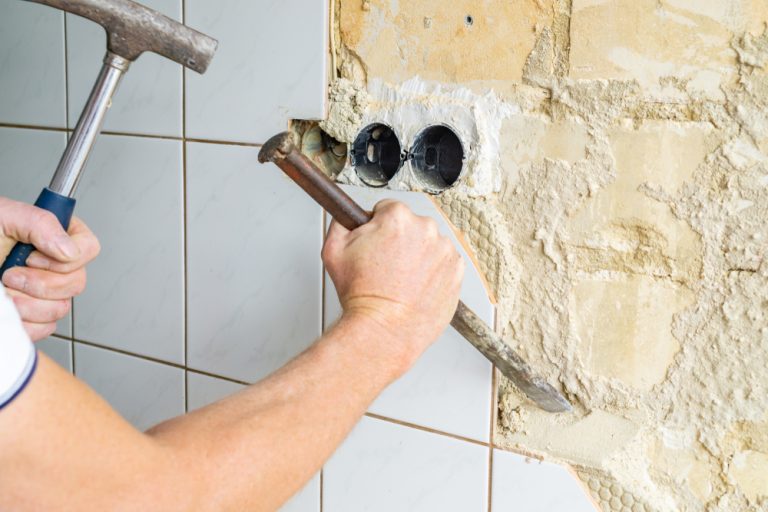
- Pry Bar and Hammer: These tools are necessary for removing old tiles.
- Safety Gear: Wear safety glasses, gloves, and a dust mask to protect yourself during the tile removal and installation process.
Also Read – How to Protect Kitchen Tiles from Oil Stains?
Step-by-Step Guide on How to Re-Tile a Kitchen
Here’s a detailed step-by-step guide on how to re-tile a kitchen, from preparation to finishing touches.
Step 1: Prepare the Surface
- Remove Old Tiles: Start by removing the old tiles. Use a pry bar and hammer to carefully lift and remove the tiles from the surface. Be sure to wear safety gear to protect yourself from flying debris.
- Clean the Surface: Once the old tiles are removed, clean the surface thoroughly to remove any remaining adhesive, grout, or debris. A clean, smooth surface is essential for proper tile adhesion.
- Repair the Surface: Check for any damage to the underlying surface, such as cracks or holes, and repair them before proceeding. This will ensure a solid foundation for your new tiles.
Step 2: Plan Your Tile Layout
- Measure the Area: Measure the area you plan to tile and calculate how many tiles you’ll need, including extra tiles for cutting and mistakes.
- Dry Fit the Tiles: Before applying adhesive, lay out the tiles on the surface to see how they fit. This allows you to adjust the layout and plan for any cuts you’ll need to make.
- Mark the Layout: Use a pencil and level to mark guidelines on the surface. These lines will help you keep the tiles straight and evenly spaced during installation.
Step 3: Apply Tile Adhesive
- Mix the Adhesive: Prepare the tile adhesive or thin-set mortar according to the manufacturer’s instructions.
- Spread the Adhesive: Using a notched trowel, spread the adhesive evenly across a small section of the surface. Work in sections to prevent the adhesive from drying out before you place the tiles.
- Create Ridges: Hold the trowel at a 45-degree angle to create ridges in the adhesive. These ridges help the tiles bond more securely to the surface.
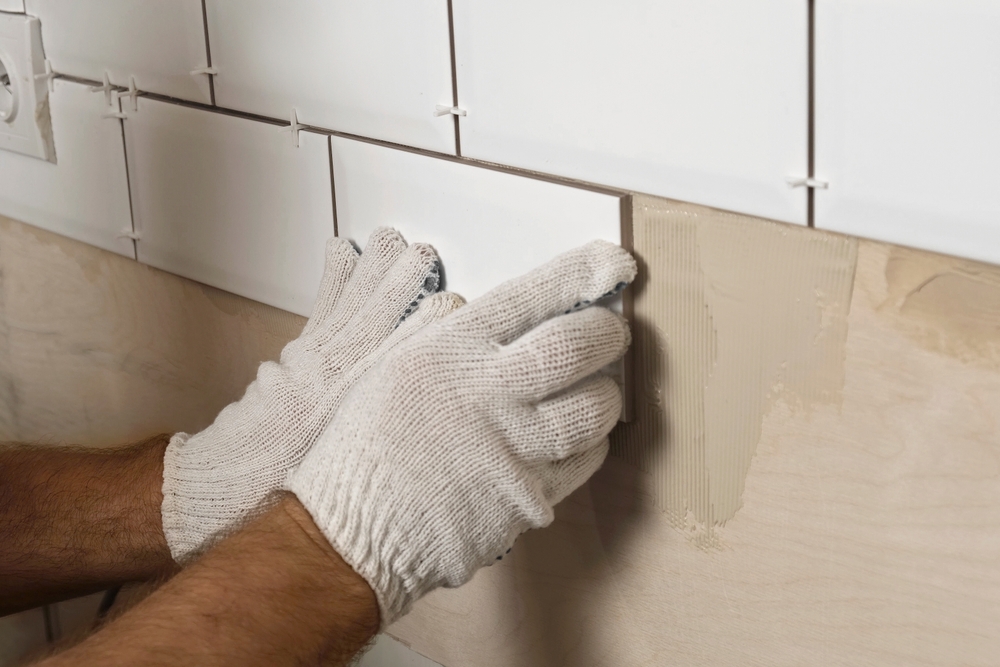
Step 4: Install the Tiles
- Place the Tiles: Start from the center of the area and work your way outwards, placing tiles carefully onto the adhesive. Press each tile firmly into place, using tile spacers to ensure even spacing between tiles.
- Check for Level: Use a level to check that the tiles are even and straight as you go. Adjust as needed before the adhesive sets.
- Cut Tiles as Needed: For tiles that need to fit around edges or obstacles, measure and mark the tiles before cutting them with a tile cutter or wet saw.
Step 5: Apply Grout
- Mix the Grout: Once the adhesive has cured (usually after 24 hours), mix the grout according to the manufacturer’s instructions.
- Apply Grout: Using a rubber grout float, apply the grout diagonally across the tiles, pressing it into the spaces between them. Work in small sections to ensure even coverage.
- Remove Excess Grout: After applying the grout, use a damp sponge to wipe away any excess from the surface of the tiles. Be careful not to remove grout from the joints.
Step 6: Seal the Tiles (If Necessary)
- Apply Sealer: If you’re using natural stone tiles or unglazed tiles, apply a sealer to protect them from stains and moisture. Follow the manufacturer’s instructions for application and drying time.
Step 7: Final Cleanup and Inspection
- Clean the Surface: After the grout has dried, clean the tile surface with a damp cloth to remove any remaining grout haze. Ensure that the tiles are spotless and free from debris.
- Inspect the Work: Check the tiles for any uneven areas, gaps, or issues with the grout. Make any necessary adjustments before considering the job complete.
Tips for Successfully Re-Tiling a Kitchen
To ensure a successful re-tiling project, consider these additional tips:
Take Your Time
- Work Slowly and Carefully: Rushing through the tile installation can lead to mistakes. Take your time to ensure each tile is placed correctly and that the adhesive and grout are applied evenly.
Choose the Right Tiles
- Durable Materials: For kitchen surfaces, choose tiles that are durable, stain-resistant, and easy to clean. Porcelain, ceramic, and glass tiles are popular choices for their strength and low maintenance.
- Consider Slip Resistance: For kitchen floors, select tiles with a textured surface to reduce the risk of slipping, especially in areas prone to spills.
Maintain Your New Tiles
- Regular Cleaning: Keep your new tiles looking their best by cleaning them regularly with a mild cleaner and soft cloth. Avoid harsh chemicals that could damage the tile surface or grout.
- Seal Grout Lines: Consider applying a grout sealer to protect the grout from stains and moisture. This will help maintain the appearance of your tiles over time.
Conclusion
Learning how to re-tile a kitchen is a rewarding DIY project that can dramatically improve the look and functionality of your space. By following the steps outlined in this guide—preparing the surface, planning the layout, applying adhesive, installing tiles, grouting, and sealing—you can achieve a professional-quality result that enhances your kitchen’s aesthetic and durability.
With the right tools, materials, and attention to detail, re-tiling your kitchen can be a smooth and successful process, leaving you with a beautiful and long-lasting kitchen that you can enjoy for years to come.